Conroe Machine is a high-precision machining, welding and production facility located in Conroe, Texas. Having only been open since 2000, the company is relatively young, but growing quickly. When Conroe Machine opened in 2000, it had two machines and two employees. Today the company has more than 100 employees and has recently moved into a new 65,000 sq.-ft. facility.
While it is a general-purpose shop, Conroe’s location near Houston results in a high percentage of business from the oil and gas industry, principally for drilling components. Some of these parts are produced by the thousands each week, around the clock.
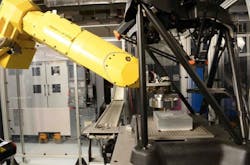
With throughput and growth rates like that, it’s imperative for the company to be as efficient as possible to keep up with orders and eliminate wasted effort, resources and time. In an effort to increase the efficiency of its operations, Conroe Machines’ CNC programmer James Wardell and robotics technician Jeff Buck integrated a Fanuc robot with a Renishaw Equator gaging system to perform part inspection and auto-compensation of a twin-spindle Okuma 2SP-250 lathe. The cell they created also boxes and palletizes finished parts.
Perhaps the cell’s greatest efficiency is its ability to pay for itself. According to Conroe Machine, the cell paid for itself in just 18 days.
Bearings are currently roughed out on four Doosan Puma lathes that originally did both roughing and finishing, and were served by four operators. These machines are now split into two cells, loaded/unloaded by Fanuc robots, doing only the roughing operation. The semi-finished parts are sent out to be case hardened to HRC 65 at a depth of 0.070ʺ (1.7mm) before the finish turning.
“Our production plateaued at 800 to 1000 total parts per day with these two cells,” says Wardell. “We had a single operator loading the machines and inspecting the parts. However, you can rely on an operator to correctly inspect only so many parts with this kind of volume, and we needed even more output.
“For our next step up, we conceived a fully automated process for the finish machining, with automatic part loading, post-process measurement, automatic tool compensation, part engraving, and boxing/palletizing the parts,” he adds. “We had pretty good ideas for the components of such a system, except for the part measurement technology, CNC type and software for tool compensation. Inspection must be fast to keep up with the cycle times on the parts, which can be as short as 98 seconds. Originally, we looked at white light laser inspection because of its speed, but the parts are too reflective. We also looked at hard gaging and shop-floor CMMs. Hard gaging was very expensive and required setup attention, and the CMM gave no speed advantage. While working with Renishaw on other projects, we were introduced to the Equator.”
The Equator uses the comparison method of measuring. A master part with known measurements taken on a CMM is used to "master" the Equator, with all subsequent measurements compared to the master. Repeatability is 0.00007ʺ (0.002 mm) immediately after mastering. The Equator uses an SP25 probe for touch and scanning data collection, at speeds of up to 1000 points per second. Styli are stored in an integral six-port changing rack, and the system is programmed through Modus Equator software.
Incorporating these multi-functional cell ideas and supporting technologies, Wardell and Buck went on to create and install a cell consisting of the Okuma 2SP-250H, a single Equator, an engraving machine, and a Fanuc M20iA 6-axis robot. In practice, the lathe’s two part carousels are loaded with raw workpieces, approximately 300 parts. The lathe’s dual gantry loaders feed the spindles and place finished parts on a chute leading to a conveyor for pickup by the robot. The robot places the part on the Equator for measurement and, if acceptable, transfers it to the engraving machine, and finally boxes/palletizes the finished parts.
The measuring methodology for the parts is simple. “We made an aluminum block with a hole in the center which is placed in the center of the Equator fixture plate,” Wardell explains. “We use this to determine our center and set our coordinate system. Each part is placed in the center of that block. We touch to get a center on the part, then surface scan for everything else. We planned the measurement process to work without a part fixture or stylus changing. The robot chooses, through the Equator's EZ-IO software, which measuring program to run for each type of part. We know the critical features we must measure to ensure the part is within tolerance.”
Sponsored Recommendations
Leaders relevant to this article:

